前言
- 什么是适配:
- 适应、兼容各种不同的情况。
- iOS 开发中,适配的常见种类:
1)系统适配, 针对不同版本的操作系统进行适配。
- 2)屏幕适配,针对不同大小的屏幕尺寸进行适配。
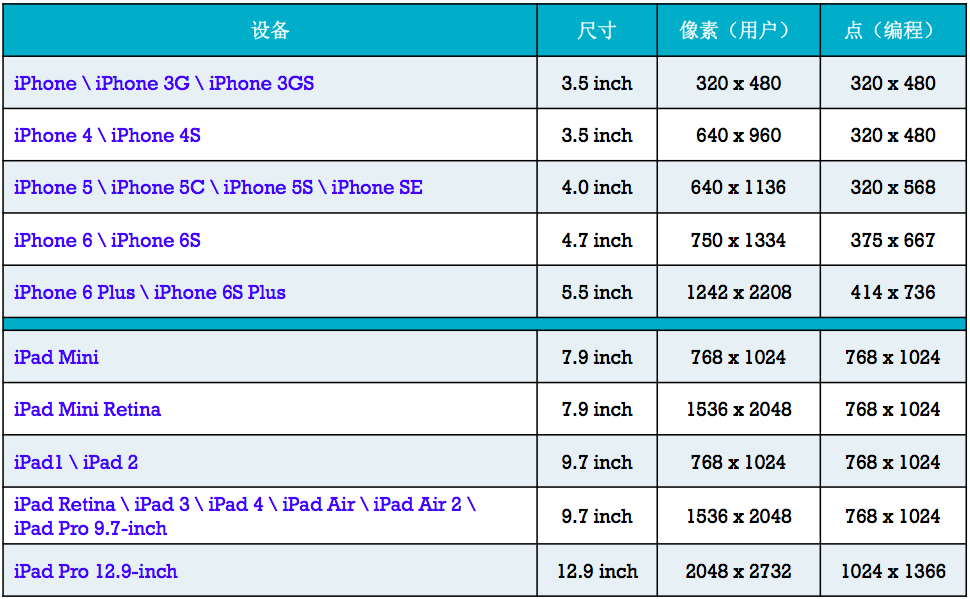
- iPhone 的尺寸:3.5 inch、4.0 inch、4.7 inch、5.5 inch 。
- iPad 的尺寸:7.9 inch、9.7 inch、12.9 inch 。
- 屏幕方向:竖屏、横屏。
1、系统适配
Objective-C
// 获取系统版本 float systemVersion = [UIDevice currentDevice].systemVersion.floatValue; // 判断系统版本 if ([UIDevice currentDevice].systemVersion.floatValue > 9.0) { // iOS 9 及其以上系统运行 } else { // iOS 9 以下系统系统运行 }Swift
// 获取系统版本 let systemVersion:Float = NSString(string: UIDevice.current.systemVersion).floatValue // 判断系统版本 if NSString(string: UIDevice.current.systemVersion).floatValue > 9.0 { // iOS 9 及其以上系统运行 } else { // iOS 9 以下系统系统运行 } // 判断系统版本 if #available(iOS 9.0, *) { // iOS 9 及其以上系统运行 } else { // iOS 9 以下系统系统运行 }
2、屏幕适配
2.1 屏幕适配的发展历史
- iPhone3GS iPhone4
- 没有屏幕适配可言,全部用 frame、bounds、center 进行布局。
很多这样的现象:坐标值、宽度高度值全部写死。
UIButton *btn1 = [[UIButton alloc] init]; btn1.frame = CGRectMake(0, iPhone3GS0, 320 - b, 480 - c);
- iPad 出现、iPhone 横屏
- 出现 Autoresizing 技术,让横竖屏适配相对简单,让子控件可以跟随父控件的行为自动发生相应的变化。
- 前提:关闭 Autolayout 功能。
- 局限性:只能解决子控件跟父控件的相对关系问题,不能解决兄弟控件的相对关系问题。
- 出现 Autoresizing 技术,让横竖屏适配相对简单,让子控件可以跟随父控件的行为自动发生相应的变化。
- iOS 6.0(Xcode 4)开始
- 出现了 Autolayout 技术。
- 从 iOS 7.0 (Xcode 5) 开始,开始流行 Autolayout。
2.2 Autoresizing
2.2.1 Storyboard/Xib 中使用
关闭 Autolayout 功能
在 SB 的 Show the File Inspector 选项卡中取消对 Use Auto Layout 和 UseSize Classes 的勾选。
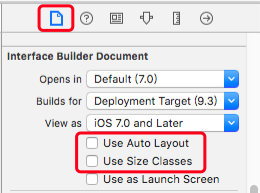
关闭 Autolayout 后,SB 的 Show the Size Inspector 选项卡中将出现 Autoresizing 设置模块,如下图。
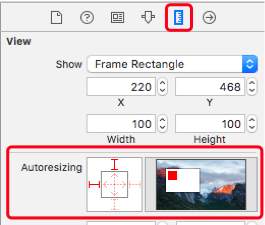
- 此设置模块左侧方框内为设置选项,右侧矩形为设置效果预览。
需要在子视图上设置。
- 小方框四周的四个设置线,选中时,子视图与父视图的边距将保持不变。
- 左和右、上和下,只能二选一,若同时选中,只有左和上起作用。
小方框内部的两个线,选中时,子视图的宽或高将随父视图的变化而变化。
设置示例:
示例 1:
- 设置子视图在父视图的右下角。
- 将子视图放在父视图的右下角。
设置子视图的 Autoresizing 右和下选项线。
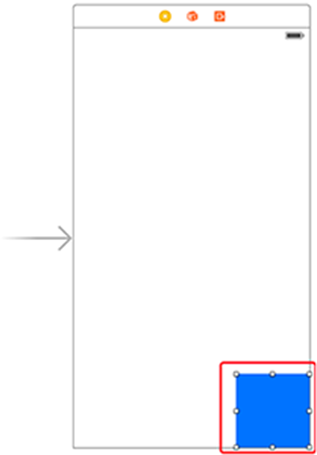

- 设置效果。
- 子视图与父视图的右和下边距保持不变。
子视图的宽和高保持不变。
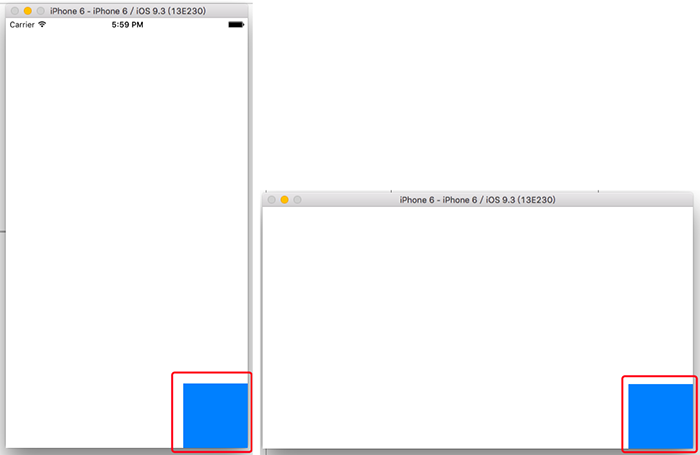
- 设置子视图在父视图的右下角。
示例 2:
- 设置子视图在父视图的下边,且宽度与父视图的宽度相等。
- 将子视图放在父视图的下边。
设置子视图的 Autoresizing 下和内部小方框的宽度选项线。
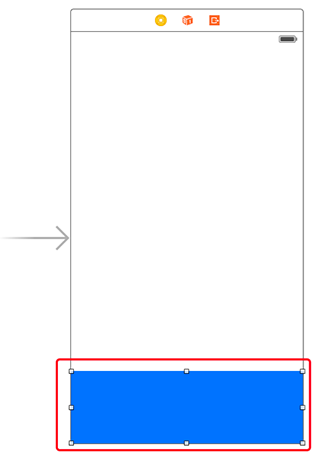

- 设置效果。
- 子视图与父视图的下和左右边距保持不变。
- 子视图的高保持不变。
子视图的宽随父视图的变化而变化。
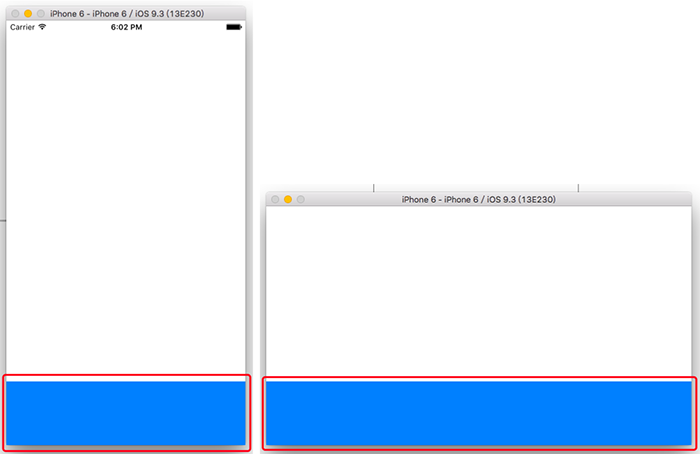
- 设置子视图在父视图的下边,且宽度与父视图的宽度相等。
2.2.2 纯代码中使用
Objective-C
子视图设置选项:
UIViewAutoresizingNone = 0, // 不跟随 UIViewAutoresizingFlexibleLeftMargin = 1 << 0, // 左边距 随父视图变化,右边距不变 UIViewAutoresizingFlexibleRightMargin = 1 << 2, // 右边距 随父视图变化,左边距不变 UIViewAutoresizingFlexibleTopMargin = 1 << 3, // 上边距 随父视图变化,下边距不变 UIViewAutoresizingFlexibleBottomMargin = 1 << 5 // 下边距 随父视图变化,上边距不变 UIViewAutoresizingFlexibleWidth = 1 << 1, // 宽度 随父视图变化,左右边距不变 UIViewAutoresizingFlexibleHeight = 1 << 4, // 高度 随父视图变化,上下边距不变
设置示例:
示例 1:
设置子视图在父视图的右下角。
UIView *blueView = [[UIView alloc] init]; blueView.backgroundColor = [UIColor blueColor]; CGFloat x = self.view.bounds.size.width - 100; CGFloat y = self.view.bounds.size.height - 100; blueView.frame = CGRectMake(x, y, 100, 100); // 设置父视图是否允许子视图跟随变化 /* default is YES */ self.view.autoresizesSubviews = YES; // 设置子视图的跟随效果 /* 子视图的左边距和上边距随父视图的变化而变化,即右边距和下边距保持不变 */ blueView.autoresizingMask = UIViewAutoresizingFlexibleLeftMargin | UIViewAutoresizingFlexibleTopMargin; [self.view addSubview:blueView];
- 设置效果。
- 子视图与父视图的右和下边距保持不变。
子视图的宽和高保持不变。

示例 2:
设置子视图在父视图的下边,且宽度与父视图的宽度相等。
UIView *blueView = [[UIView alloc] init]; blueView.backgroundColor = [UIColor blueColor]; CGFloat w = self.view.bounds.size.width; CGFloat y = self.view.bounds.size.height - 100; blueView.frame = CGRectMake(0, y, w, 100); // 设置父视图是否允许子视图跟随变化 /* default is YES */ self.view.autoresizesSubviews = YES; // 设置子视图的跟随效果 /* 子视图的宽度和上边距随父视图的变化而变化,即左右边距和下边距保持不变 */ blueView.autoresizingMask = UIViewAutoresizingFlexibleWidth | UIViewAutoresizingFlexibleTopMargin; [self.view addSubview:blueView];
- 设置效果。
- 子视图与父视图的下和左右边距保持不变。
- 子视图的高保持不变。
子视图的宽随父视图的变化而变化。

2.3 Autolayout
- 使用详情见 文档。
3、App 图标和启动图片
3.1 App 图标设置
App 图标尺寸
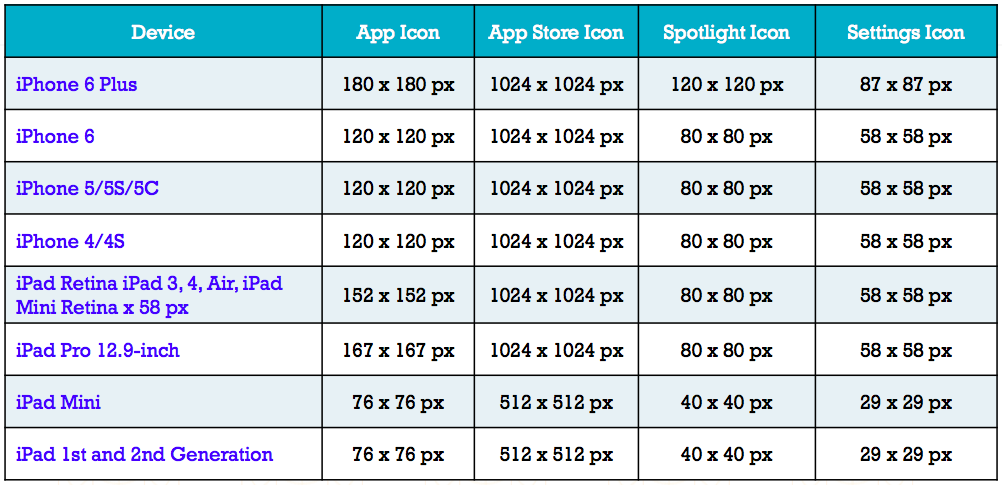
App 图标设置
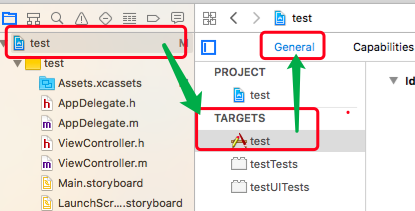

- 默认从 AppIcon 中加载 App 图标。

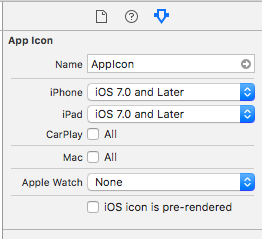

- 20pt 表示 20 个点,即 2x 图片的像素为 (20 * 2) * (20 * 2) 像素,3x 图片的像素为 (20 * 3) * (20 * 3) 像素。
3.2 启动图片设置
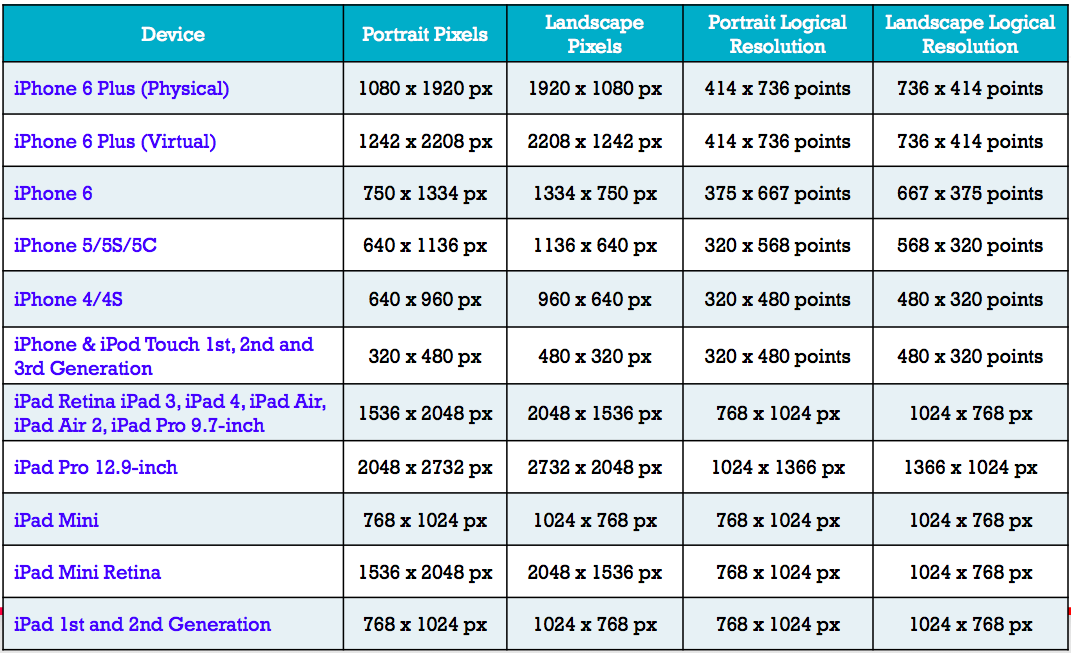
启动图片尺寸
启动图片设置


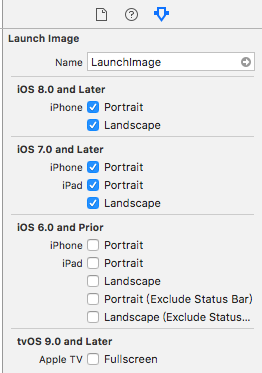
- Launch Images Sources :从指定的位置加载启动图片。
- Launch Screen Files :默认,从指定的文件(xib 或 sb 文件)加载启动屏幕(启动图片)。
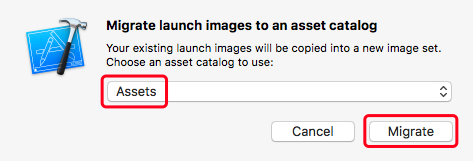
- 修改为从指定的位置加载启动图片,清除 Launch Screen Files 项内容,点击 Use Asset Catalog... ,按照默认设置,点击 Migrate 。


- 在 Assets.xcassets 中将自动添加 LaunchImage(或者 Brand Assets)。
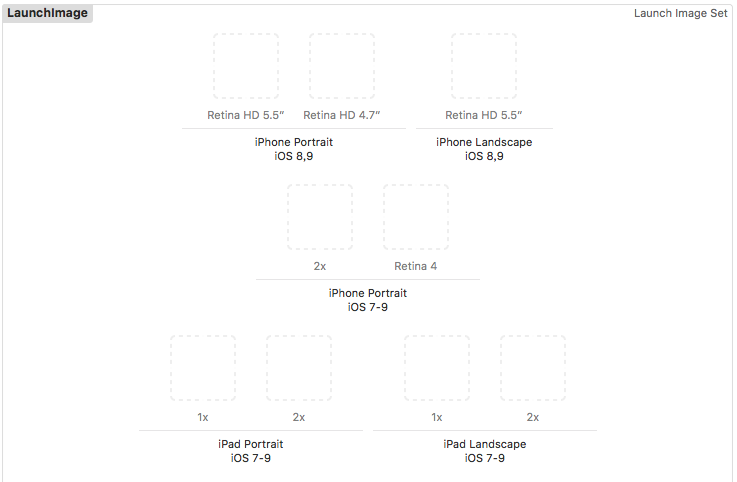
- Retina HD 5.5 为 5.5 寸屏的设备,Retina HD 4.7 为 4.7 寸屏的设备,Retina HD 4 为 4.0 寸屏的设备;Portrait 为竖屏,Landscape 为横屏。
4、iOS 设备各种尺寸
4.1 iOS 设备尺寸

4.2 Resolutions 分辨率
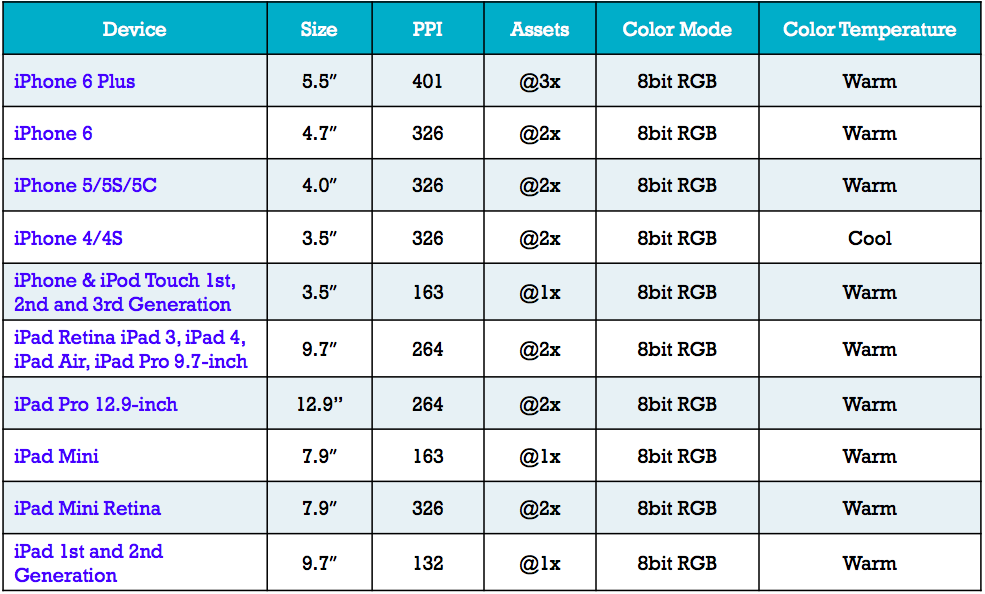
4.3 Displays 显示
4.4 Dimensions App 图标尺寸

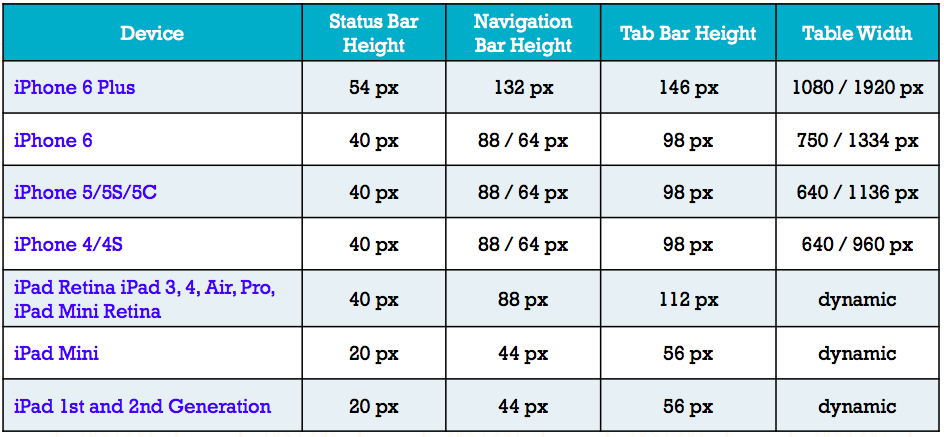
4.5 Common Design Elements 常见控件尺寸
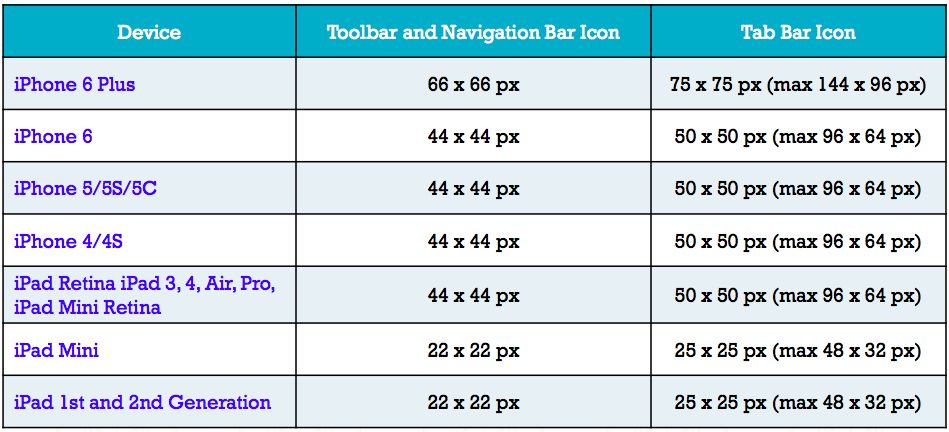
4.6 Icons 控件图标尺寸
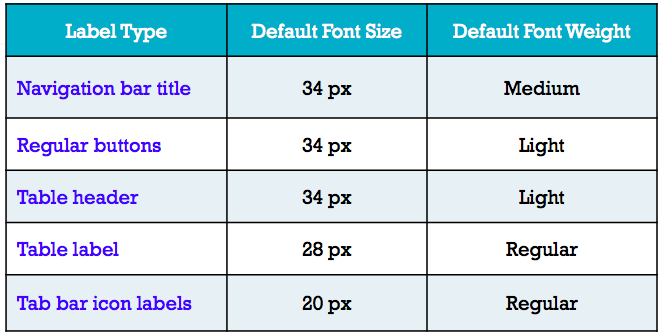
4.7 Default Font Sizes iPhone 5/5C/5S/6 控件字体大小
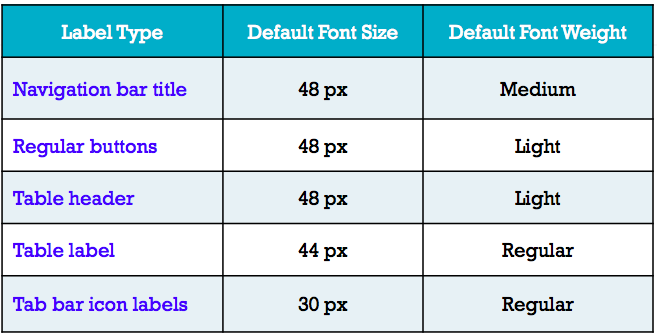
4.8 Default Font Sizes iPhone 6 Plus 控件字体大小
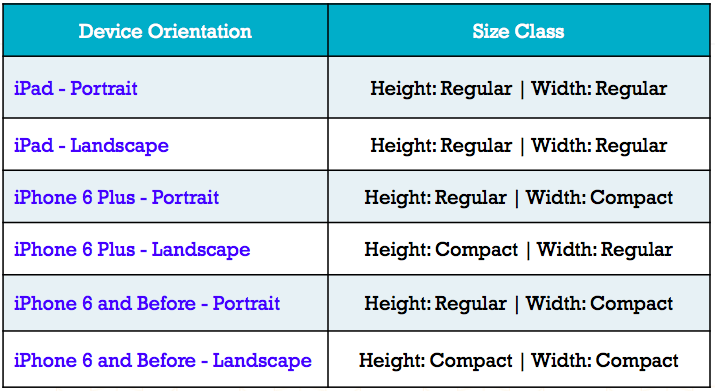
4.9 Size Classes For Adaptive Layout
